Tuesday, August 17, 2010
Teddy Bear Cake
I think the best way to start this post is by showing the after-effect. Would you look at the look on that little boys face? That's my big one year old! He just adored his chocolate teddy bear cake!
We have this tradition of making a teddy bear cake for each of our kids on their first birthday that they get to just rip apart and devour. Nothing super fancy, but, oh, how they love it!
First Attempt at Fondant/Baby's First Birthday!
My little boy just turned 1 today!!! I can't believe he's so big already!
Well, one of my favorite parts of birthdays is the cake! Yum! And since it was a first birthday, it couldn't be just any cake. It had to be the family traditional teddy bear cake. I'll post a picture of that in just a minute. But first, I wanted to show the cake that everyone else got for little man's birthday!
It started out with boxed chocolate fudge cake mix. I know, super fancy, right? That's why I spiced it up a little. After it was all made, I filled it with almond flavored buttercream frosting and this amazing raspberry filling. Trust me. You have to try this filling! I had lots leftover, so we snitched tons. It may not look like much here, but I wanted to show just how thick this stuff was. And it all started with a couple bags of frozen raspberries. Yum!
And here's what's left of the frosting. Again, not a great picture, but I can just look at this picture and remember how amazing it tasted!
I froze my cakes before I started working with them just to be sure they would be strong enough to withstand my abuse to them.
This was the crumb coat I put on the cake after I layered the whole thing but before I put on fondant.
And here it is all done! This was my first time making fondant and I have to say I wasn't super impressed with the taste or the quality, but I know this was just a beginning try, so I'll keep trying later on other cakes and see if I can't make it work better. I just used the Allrecipes.com marshmallow fondant recipe. I'm not linking to it because I'm not sure I'm in love with it yet.
My wonderful little 2 year old decided it looked so yummy before I put all the dots on it that she just HAD to take a fist-full out to try. Hence the reason my dots aren't placed evenly. Oh, and I kept having my fondant sticking to my parchment after I rolled it out, so I used some water to be able to make it a little stickier and apparently I used too much, so the water kinda sweated all over my cake. I just had visions of my high school rivals that used to always say they "bled blue" since they had so much school spirit. (Don't ask. We thought it was weird, too.)

I took pretty much all week working on this wonderful little cake. I think if I do something like this again, I'll just do it a couple days before because the raspberry filling kinda soaked into the cake a little. But overall I was pretty happy with how it turned out!
Well, one of my favorite parts of birthdays is the cake! Yum! And since it was a first birthday, it couldn't be just any cake. It had to be the family traditional teddy bear cake. I'll post a picture of that in just a minute. But first, I wanted to show the cake that everyone else got for little man's birthday!
BTW, here's my way of making buttercream frosting. It's not my mom's way. My mom's way always looks/tastes gross when I make it. I can't figure out how she does it!!!
Buttercream Frosting:
1/2c butter/margarine (I honestly use the tub stuff)
1/2c shortening
1 tsp vanilla (or almond extract -- or whatever other one you want, I guess)
2 lbs powdered sugar
Put the first three ingredients in your mixer and let her rip. Add the powdered sugar about 1 cup at a time and let it really mix in well. I know I've put in enough sugar when it kinda starts to look like playdough being rolled around in powdered sugar. Once you get to that point, let it go a couple more minutes on about medium in your mixer and it should be pretty good.
My mom will frequently add milk at this point, but that's the part I always mess up, so I never bother with it.
I took pretty much all week working on this wonderful little cake. I think if I do something like this again, I'll just do it a couple days before because the raspberry filling kinda soaked into the cake a little. But overall I was pretty happy with how it turned out!
Thursday, July 29, 2010
What I've Been Up To
I've been working hard on a project that I was very anxious to post on here, but it's just taking me so long that I thought I should give a little preview. Here's a picture of my kitchen before I got started. It's all pretty outdated and definitely needed some paint. Well, I'd been reading online about this amazing woman that has almost the same kitchen design that I have and she painted all of her cupboards white. It turned out SO pretty! So I thought I'd copy her. Problem being that I had NO idea how much work it would be! My hubby went out of town for a week and I had these grand ideas of surprising him when he got home with a pretty black table and white cupboards.
This is the other side of my kitchen. Can you tell I have little kids? Lots of fun magnets all over the fridge!
Here's everything emptied out and with no doors.

Well, since I had to take everything out, I had to have some place to put it all. My house has never been so messy! I stored everything in the hallway, living room, pretty much anywhere I could cram stuff.
To be honest, I hated it at this point. There were a lot of tears every time I talked to my husband at night during this stage. I just knew I wouldn't finish it in time and what on earth was I going to do if it all looked horrible when I finished!
Yep. Still hating it.
But I kept pushing forward. Here are the shelves.
And then he came home! I was super sad that I didn't finish it before he got home, but then I was really glad to have his help for those bottom cupboards. I really hated those cupboards.
And here it is as it stood yesterday. I still need to finish a couple other shelves so I can put those pots and pans on the counter away. And, yes, it was spaghetti night.
Here's the other side. See those two cupboards on the bottom? That's where I still need to put in shelves.
But the best part are my new shelves next to my window. I love having a place to put some pretty plants! It just helps to add a little more color to my world. How odd that just adding a little greenery can brighten things up so much!
So this is where we stand right now. I still need to paint 7 drawers and 27 doors, add new hardware, and then finish all the clean up stuff, but I really do like it so much more now. Looking at the before pictures, I can honestly say that I LOVE it! And I fully plan on posting more pictures as soon as I finish the whole project, so keep posted!
Tuesday, July 20, 2010
Kitchen Table
When my hubby and I first bought our house back in 2002, we decided we needed some new furniture. The two big things we bought (oddly enough) were a dryer and this lovely kitchen table. Well, it was lovely at the time. You know, your perfect first dining room table from the early 2000's. Pretty standard. Well, over the years, the kids have been pretty hard on it. Plus I have this water addiction (good thing). Problem is, I always leave my water sitting on the kitchen table. This table just wasn't meant to handle all that water! My hubby said I couldn't have a new kitchen table, though, until our youngest turns 5 so we won't have to replace it again in just a few years. So I kinda have to make due with this one. Hmmm... What to do about it since it drives me crazy? Why, paint it, of course!
Before picture.
This is just after I sanded the whole thing down. I took the middle leaf out of it and took the whole thing out to the garage. Then I sanded down both leaves and the whole table. Once I was done sanding, I wiped the whole thing down with a wet washcloth to get rid of all the dust.
Prime time! Before I painted the whole thing, I wanted to prime it all. I have to be honest. I hate priming things. I normally never do it. But I wanted this to turn out really nice, so I was good and did it anyway.
And here it is all black. Pretty, isn't it? Now, before I was allowed to bring it back inside, I put four coats of polyurethane on it so we won't have this whole water damage problem again. Trust me. It was a necessary step.
Friday, July 9, 2010
Floating Shelves
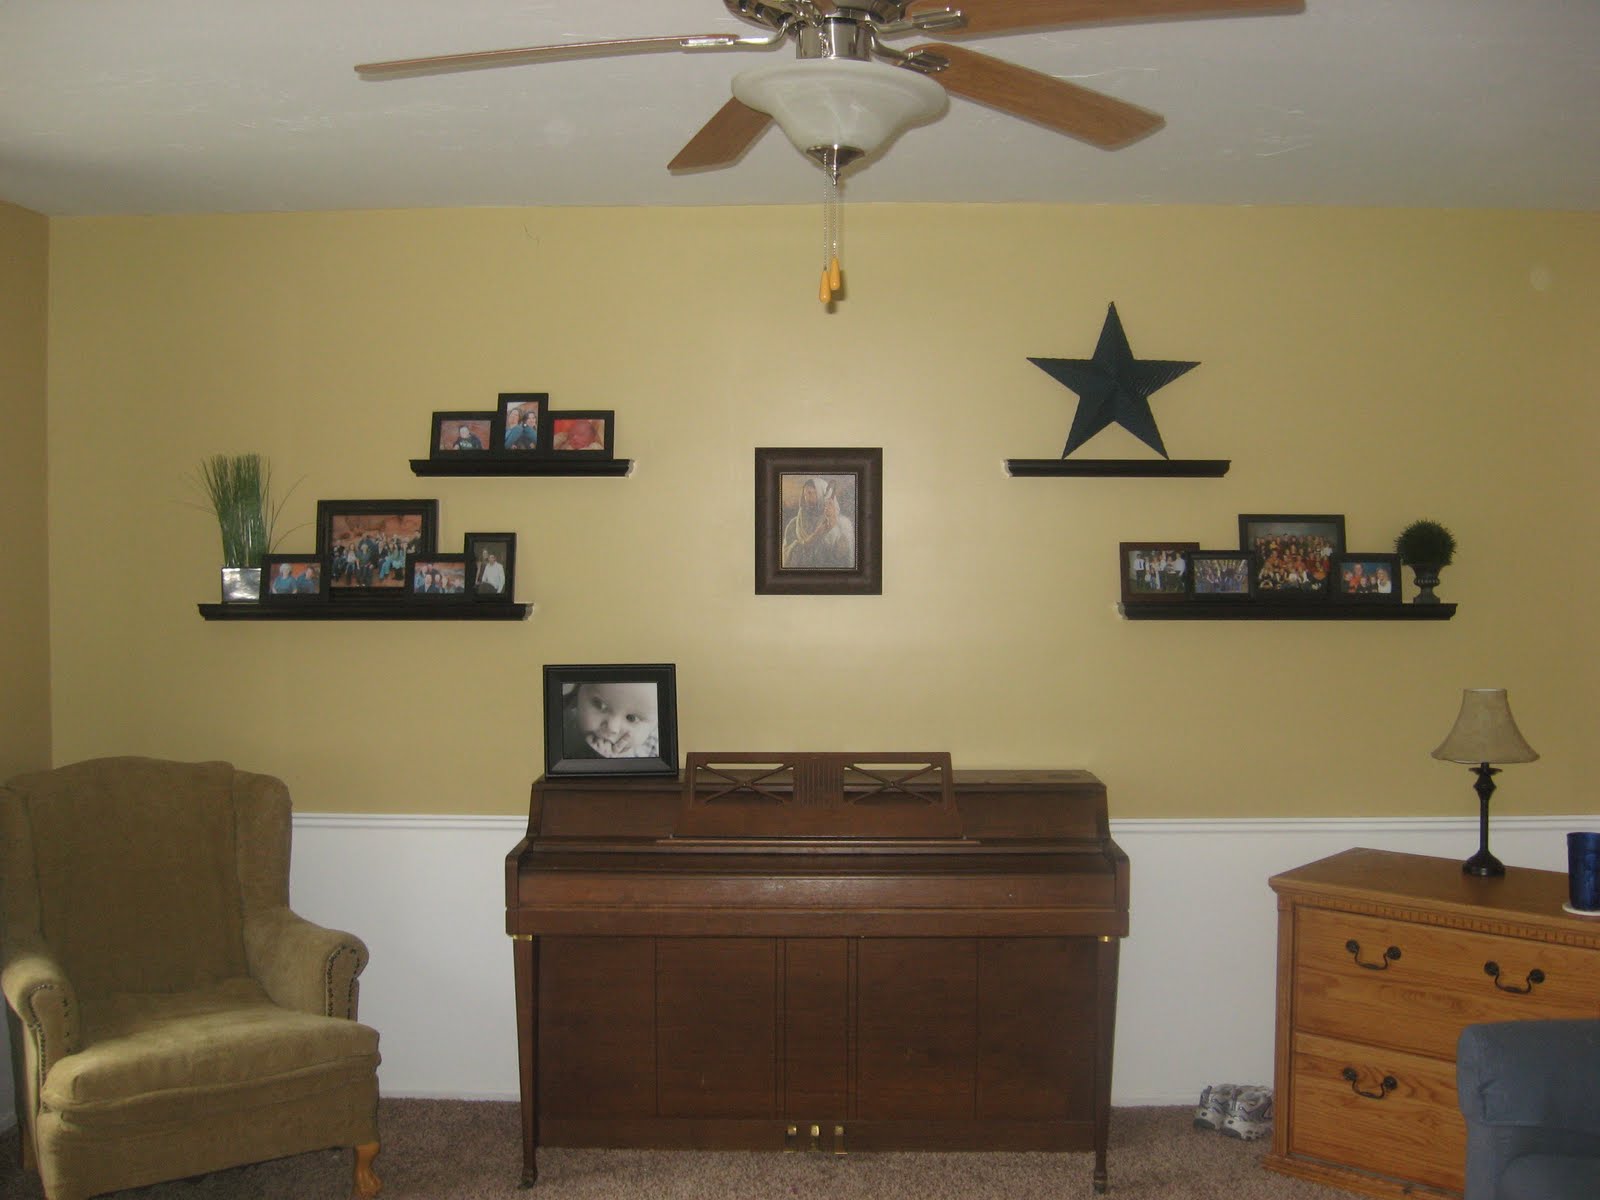
I have this beautiful living room (well, it will be beautiful. I'm determined that it will be). Sad thing is, I'm insanely intimidated about putting anything up on the walls in there. Therefore, I have these huge BLANK walls staring at me every time I go in there.
I also have this amazing sister in law and brother in law that have these gorgeous floating shelves in their family room with lots of fun pictures of their kids. Every time we go over there, I find myself gravitating toward those shelves just to look at the beautiful pictures! So I finally decided to get some nerves, and some shelves, and put up some of my own!
Here's the before picture of the living room wall.
Here are my supplies. Well, minus a few things, but you'll see it all in the finished product. I got these shelves from Home Depot. I bought two 35" shelves and two 24" shelves in espresso. They're super easy to install. I started out over thinking it, but then they were easy peasy once I got the hang of it. You just find where you want to put them up, put up your stud (the piece of unfinished wood) and put in one screw, then put a level on top to make sure it's all nice and straight. Put in the other two screws (on the long one -- only one more on the shorter one). Then put the actual shelf on it. I tried to center it on the stud. Then put in two more screws to secure it to the stud. Then put some cute little stickers to cover your screws. See, super easy!
And, here's the finished product. I still want to put in a huge temple picture right in the middle and get some pictures of my other three kids up there. I think it's turning out gorgeous so far! Oh, and I'm going to put some other letters on the piano, too. I'll post a picture of that later!

I also have this amazing sister in law and brother in law that have these gorgeous floating shelves in their family room with lots of fun pictures of their kids. Every time we go over there, I find myself gravitating toward those shelves just to look at the beautiful pictures! So I finally decided to get some nerves, and some shelves, and put up some of my own!
Here's the before picture of the living room wall.

Monday, July 5, 2010
Fourth of July Trifle Cake
Isn't this so fun and patriotic? I mean, come on, what could be better than Old Glory, lots of fresh strawberries and blueberries, and creamy, dreamy trifle?
And, yes, I was corrected by almost every member of my family saying I didn't have enough stripes. Oh well! It was delicious anyway!
Now, I call this the Fourth of July Trifle Cake, but it's been called All-American Dessert and American Flag Snickers Cake. You read that right. It has Snickers in it. Now are you interested? Here's the link to the amazingly easy recipe. Oh, and I made it with fresh whipped topping (as in, I made it myself from whipping cream. Just beat up two pints and add some powdered sugar and vanilla to taste).
So, go get your patriotic on while you still have a few blessed hours free of work (hopefully)!
Thursday, July 1, 2010
Meatball Subs
We had the yummiest dinner tonight! It was Meatball Subs made with this amazing sauce! I cheated and used the Costco meatballs, put them on a hoagie roll and poured on a good size spoonful of the sauce from the spaghetti and meatball recipe. So good! Try it! And the best part was that I still have a TON of sauce left over for making homemade pizza tomorrow night for dinner.
Sorry, I don't think I'll be that amazing with taking pictures of the food just because dinnertime is pretty crazy around here (who has the time to think of a camera when you have 6 hungry people needing food?!). I promise, though, these are amazing!
Subscribe to:
Posts (Atom)